Showing posts with label M2JL STUDIO BLOG. Show all posts

29.9.11

CENTRAL CONDOMINIUMS : DESIGNING KITCHENS

Central Condominiums Kitchen dark cabinet white glass backsplash white counter interior design
Part of my work with Central was to help unit owners select finishes for their kitchen. We created color schemes that best suited their needs and budget, based on the available samples. The owners had to choose from a group of nine cabinet samples, eleven countertop samples and fifteen backsplash samples. The available colors were neutral for the most. It's always a good idea to choose a neutral palette for items that are fixed and use bright colors as accents for items that can easily be changed at a reasonable price (in case you grow tired of a particular color).

Central Condominiums Kitchen cabinet selections
Central Condominiums Kitchen countertop selections

Needless to say, there are a lot of possible combinations : 1485 to be exact (just for the kitchen). That's a little more than 6 times the amount of available units! So it would have been possible to make sure that none of the kitchens in the building would be identical.  Granted, not every sample works well together and some finishes were more popular than others. Still, the owners had a lot of choices and it was fun putting various combinations together during our meetings. 

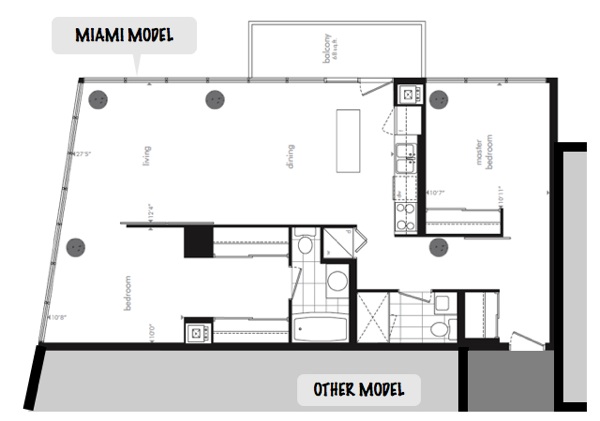
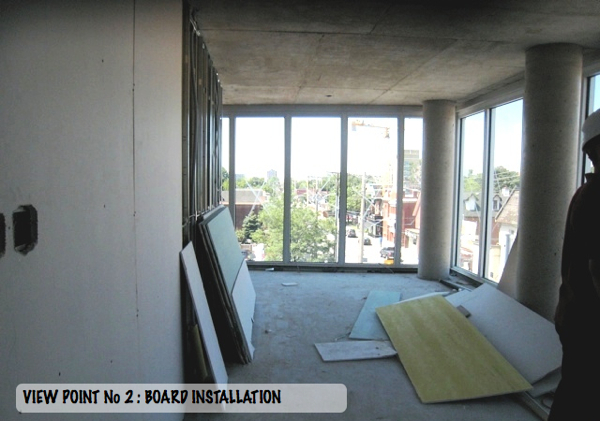
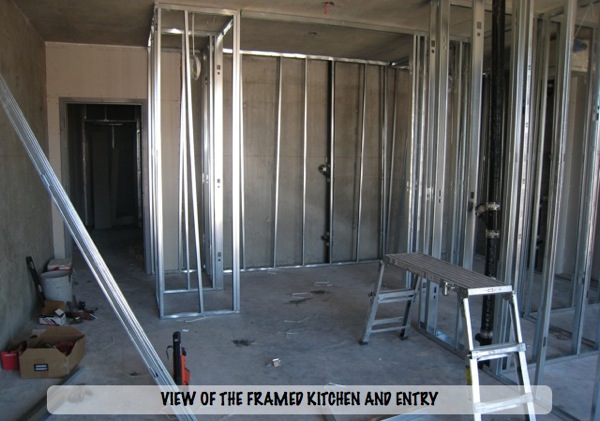
All in all, there is an interesting range of color combinations for kitchens throughout the building. The installation of the kitchen happens after the walls have been primed. Prior to fabricating the cabinets, the kitchen suppliers visited the site and checked the dimensions of the kitchen space in various units, marking down the position of each appliance.
Central Condominiums Kitchen dark cabinet white glass backsplash white counter interior design

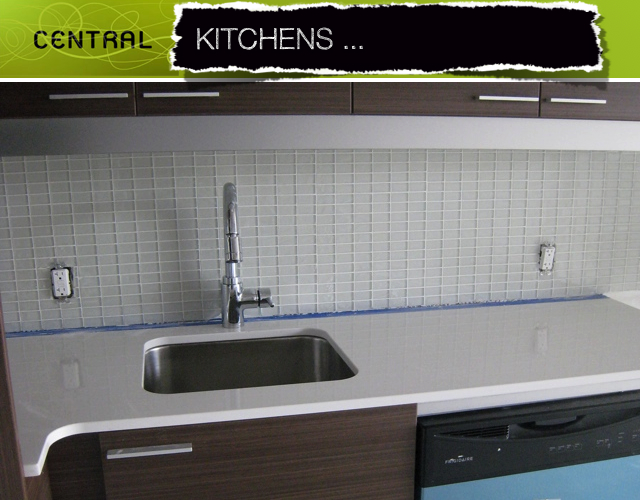
After carefully checking the dimensions on site, the kitchen suppliers started delivering and installing the cabinets a couple weeks ago. On a recent visit to the site, I took pictures of the progress in some units where the kitchens were almost completed. The surface still needs to be washed, but you can still see how different combinations of color can alter the mood of the spaces, as shown below:

Central Condominiums Kitchen dark cabinet white glass backsplash white counter interior design
With a medium colored cabinet, the white glass backsplash and white countertop brightens and freshens the look.

Central Condominiums Kitchen dark cabinet white glass backsplash white counter interior design
The metal backsplash is a nice contrast against the dark textures cabinets and the dark counter. Once the track lights are up, it will look spectacular.

Central Condominiums Kitchen dark cabinet white glass backsplash white counter interior design
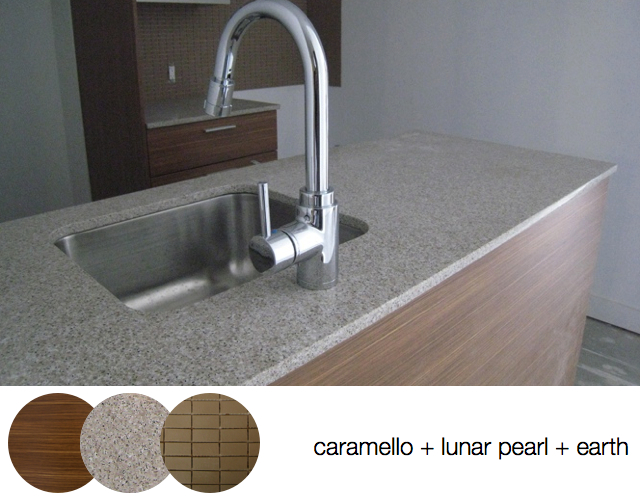
The lighter cabinets with the warmer countertop and backsplash softens the look of the space and gives it a bit more traditional look while staying contemporary.

Central Condominiums Kitchen dark cabinet white glass backsplash white counter interior design
Using the same traditional style counter with the darker cabinet and complementary glass backsplash, modernizes the look a little more than the previous combination.

Central Condominiums Kitchen dark cabinet white glass backsplash white counter interior design
The dark countertop and backsplash mixed with the lighter cabinet gives a very graphic look due to the high contrast. This look is more dynamic and will look great with a bold accent color.

Central Condominiums Kitchen dark cabinet white glass backsplash white counter interior design
It's possible to go completely dark with a dark cabinet, dark countertop and dark backsplash. With the white appliances contrasting the dark finishes, this combination will require a good balance of color with the accessories. Using stainless steel or black appliances instead, this space could look very sexy with dark walls to get more of a lounge ambiance.

Central Condominiums Kitchen dark cabinet white glass backsplash white counter interior design
The darker cabinets also look great against the white countertop and white glass backsplash, which softens the look of the kitchen and brightens the space. 

13.9.11

CENTRAL CONDOMINIUM : INSIDE THE COURTYARD

Modern Ottawa Central 1 Condominiums courtyard construction 
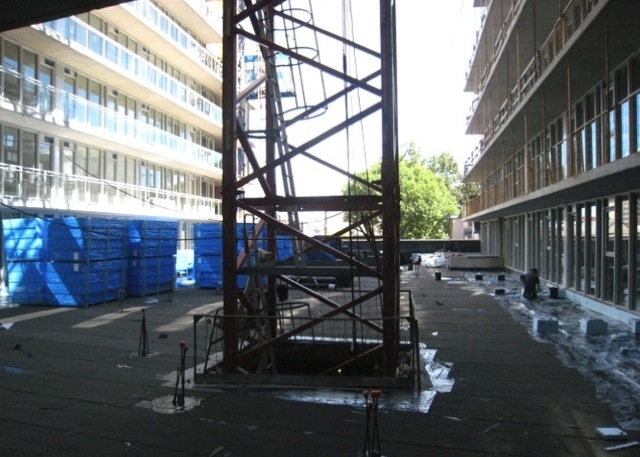
As some of you already know, the amenities at Central 1 include an interior courtyard. This feature essentially allows everyone living in the condo to have a shared backyard in the city. While the priority is to complete the units, work is also being done in the courtyard. I've been taking pictures of the courtyard as subtle changes occurred, documenting the process. Last week all the original construction material was gone and some workers were preparing the ground. I have enough pictures to show you a bit of the evolution of the courtyard so far.

Modern Ottawa Central 1 Condominiums courtyard construction Modern Ottawa Central 1 Condominiums courtyard construction 
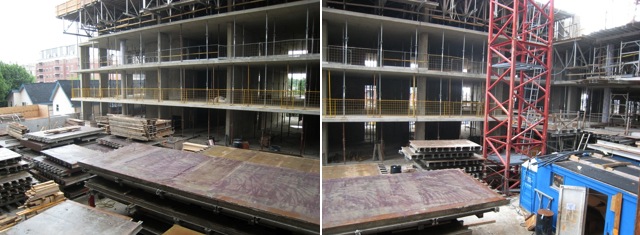
Previously the courtyard was the perfect location to store various building materials. There was even a little "office" (blue box on the right). The big red structure on the right is for the crane used to lift items. It's really high. Modern Ottawa Central 1 Condominiums courtyard construction Modern Ottawa Central 1 Condominiums courtyard construction Modern Ottawa Central 1 Condominiums courtyard construction Once most of the windows of units facing the courtyard were in, almost everything was taken out. You can see the  concrete slab underneath. Modern Ottawa Central 1 Condominiums courtyard construction Last week, it lookeds like rigid insulation was added on the side wall and the ground was water proofed. I'm looking forward to see how this looks later on. Also given the fact that the building is so close to the neighboring house, some of the workers were also repairing the roof of the house next door, which was much needed. Modern Ottawa Central 1 Condominiums courtyard construction Modern Ottawa Central 1 Condominiums courtyard construction

6.9.11

CENTRAL CONDOMINIUM : LOS ANGELES MODEL

Central Condominium Modern Ottawa Central Condominium floor plan Modern Ottawa
The construction process is going well at Central and the rooms are taking shape. The Los Angeles is another available model that faces North. It’s a two-bedroom-two-bathroom unit. There are seven units with this floor plan in the building.

It's nice to see the finished walls. It makes a big difference. You can see below a before and after of the view of the entry from inside the unit. It's not completely done but it's well under way. You can also see a portion of the master bedroom with the closet opening on the right and the smaller opening leading to the ensuite on the left.
Central Condominium Construction Modern Ottawa
For a lot of the units, the cabinets are in. Here you can see below the popular Tuxedo finish in one of the Los Angeles units.
Central Condominium Construction Modern Ottawa
This model has a compact kitchen tucked in a nook. I took pictures of this nook at different stages of construction to see the evolution of that space. The fridge will be placed in the large opening on the left and the stove and fan will be placed in the opening on the right. In front of these cabinets, there will be an island attached on the wall to the left that will house a sink and a dishwasher. You can see the pipes protruding from the side of the wall and some of the cabinets are already installed. The owners had a choice between different types of appliances. From the look of it, it looks like this one will have a slide-in stove.
Central Condominium Construction Modern Ottawa
The tiles in the bathroom are also being installed. For example in the ensuite below, you can see the Beta in Crema tiles on the floor and on the wall. In this particular unit, the owner has decided to upgrade the tiles on the wall surrounding the tub, so the tiles on the floor and the tiles around the tub are the same. It gives a nice effect. The grout should follow soon after.
Central Condominium Construction Modern Ottawa

There's also work being done on the outside. The frames for the railings on the balconies are also being installed.
Central Condominium Construction Modern Ottawa

19.8.11

CENTRAL CONDOMINIUM : HRV

Central Condominium HRV Green LEED Building Canadian Green Building Council Modern Ottawa MOOT
Central 1 is registered with the Canadian Green Building Council as a LEED Silver building. As such, a LEED consultant also works on this project, meeting the trades on a regular basis to check the progress of the building. One of the main LEED features is the presence of a Heat Recovery Ventilator (also known as an HRV or Air Exchanger) in each unit. The HRVs, which will be hidden in the ceiling, contribute to making the building eco-friendly, by reducing energy consumption.

Having access to fresh air is very important in a home, but in Ottawa, fresh air is rather cold most of year. Opening the windows in the winter to let fresh air in and stale air out, also means that the space inside will get cold and will have to be heated again, which wastes energy. Enter the HRV which is essentially a box that "recycles heat" so that you can get fresh air without having to reheat it too much.

Central Condominium HRV Green LEED Building Canadian Green Building Council Modern Ottawa MOOT

Here's how it works: In the winter, we know that the fresh air outside is cold and the stale air inside is warm. By having both streams of air passing through the HRV, the heat from the stale air leaving the unit is transferred to the cold fresh air entering the unit. The two air streams don't get in direct contact with each other but there is a transfer of heat that occurs. The heat from the exiting stale air is transferred to the entering fresh air. As a result, the heating system doesn't have to work as hard to heat keep the indoor temperature at a comfortable level and the occupants pay less in energy bills.

There are a lot more eco-friendly features in this project. Stay tuned for more.

26.7.11

CENTRAL CONDOMINIUM : MIAMI MODEL

Central Condominiums Modern Ottawa Miami model
The Miami model is another interesting floor plan from the Central 1 project. Half of the walls defining the unit have floor to ceiling windows. So there's a lot of natural light that comes in. This larger unit also has an island in the kitchen and a pretty neat walk-in closet.
Central Condominiums Modern Ottawa Miami model

The construction of this unit follows the same work breakdown schedule as the other units : first the demising walls, then the interior walls studs, followed by the rough-ins and the gypsum boards.

The following fours images taken in sequence were taken standing in the living room area looking towards the kitchen.
Central Condominiums Modern Ottawa Miami model

Similarly, the following four images were taken standing in the kitchen area looking towards the living area.
Central Condominiums Modern Ottawa Miami model

There are six Miami models in this project. Each at different levels of completion as the building crew moves towards the top of the building. The ceramic floor in the bathroom and the cabinets should start soon (if not already). It will be interesting to see how the rooms take shape.

16.7.11

CENTRAL CONDOMINIUMS : TORONTO MODEL

Modern Ottawa Central Condominium
There are several types of floor plans available in the Central 1 building. One of the smallest ones is a 478-square-foot-one-bedroom-unit called the Toronto, one of the models I will be following throughout the construction process. There are six units of that kind in the building
Modern Ottawa Central Condominium
The Toronto unit faces North. It is slightly recessed and nestled between two other types of unit. As a result, this unit receives a bit less natural light compared to other units with a similar orientation. It will be interesting to see how different finishes affect the overall look and feel of this space.

Modern Ottawa Central Condominium construction process
Temporary wooden railings are installed while waiting for the concrete to cure. There are also temporary posts (shown in yellow) supporting the slab above. During that time, framers trace the location of the future partition walls on the floor (shown in red).

Modern Ottawa Central Condominium construction process
After a certain time, the windows are ready to be installed. In this case, the window frames were installed without the glass and the glass was installed after. You can see above the frames for the unit leaning on the wall on the left and the installed windows on the right. In each unit, a copy of the floor plan as well as the schedule of finishes is taped to the windows.

Modern Ottawa Central Condominium construction process
Here's the overall view of the installed windows in one of the units. There are openings on either side of the wall: one for the bedroom on the left and one for the living area on the right.

Modern Ottawa Central Condominium construction process
The view is rather nice on a sunny day.

Modern Ottawa Central Condominium construction process
The unit is taking shape. At first there's an opening between the Toronto and another unit that needs to be closed in. Since both units share a wall, this wall will have to be fire rated. Along with any wall between a unit and a common area, this wall is the first to be installed in the building. They are called demising walls. By code, they have to be inspected before being closed in.

Modern Ottawa Central Condominium construction process
Typically, one side will be built first so that an inspector can make sure they are built to code. Once the installation has been approved, the wall can be closed on the other side. This is to ensure that the building code is respected regarding the smoke and fire rating of the walls as well as sound insulation from one unit to the other. Following the approval from the inspector, the wall is closed in as shown above. At this point a heat recovery unit (HRV), the beige box above on the ceiling, is installed. In this case, the HRV unit is located in the ceiling above the future bathroom. This unit enables users to save energy.

Modern Ottawa Central Condominium construction process

This is a similar view after the metal studs have been installed to form the bedroom and the closet that will house a stacked washer and dryer.

Modern Ottawa Central Condominium construction process
After that comes the rough-ins, shown above. At this point all the outlets and switches are installed, as well as the main ventilation ducts, plumbing pipes, valves, etc.

Modern Ottawa Central Condominium construction process
This is a view of the entry wall with basic framing on the left and the installed demising wall. This wall separates the unit from the corridor. The concrete portion is adjacent to the building's stairs. Only the small opening requires the demising wall which consists of four layers of drywall (2 on each side of the metal studs), insulation, fire rated tape and caulking.

Modern Ottawa Central Condominium construction process

Here's a view of the wall behind the future kitchen before the installation of the partition walls.

Modern Ottawa Central Condominium construction process
Once the metal studs are installed, you can see the space taking shape. On the left side you can see the wall that will surround the fridge and hide the closet from the living area. You can also see how the kitchen will fit in the space and a portion of the wall in the dining area.

Modern Ottawa Central Condominium construction process
After the framing is done, the electrical, mechanical and plumbing crews install their rough-ins for the ventilation, heating, cooling, water services and electrical outlets. The red flexible pipes are for the hot water and the white ones are for the cold water. The pipes in the middle of the image will be for the kitchen sink. The one on the right will be for the washer.

Next on the schedule is the installation of the bulkheads and the drywall. This will make a big difference in the look of the space. The gypsum boards are already in some of the units and should be installed soon.

LinkWithin

Related Posts Plugin for WordPress, Blogger...